ServiceM8 Forms Guide
Master ServiceM8 Forms then automate them with AI.
Forms in ServiceM8 are powerful (JSAs, SWMS, sign-offs, inspection reports, contract variations) but building them is fiddly: Word merge fields, Wingdings checkboxes, slug rules, conditional questions. This guide walks every step from your first form to AI builds it for me, in the same order as the video.

Chapter 01
Forms are great. Building them is a pain in the ass.
If you run a trade or service business on ServiceM8, forms are how the field becomes paperwork. Compliance reports, JSAs, SWMS, take-5s, inspection sheets, sign-off sheets, contract variations, all of it. They run on the iPad in front of the customer and they print as a PDF that lands straight in the job. (ServiceM8's own intro: Forms Overview.)
The catch: the building process is splattered across three places. The questions live inside ServiceM8. The look-and-feel of the output PDF lives in a Microsoft Word template. The connection between them is a system of merge fields, slugified codes you have to type into the Word doc by hand, and one typo means the field renders blank. And anything advanced, conditional questions, tickbox checkmarks, calculated totals, uses real Word field syntax with Wingdings glyphs.
What this guide covers
- Anatomy: the three records that make a form
- UI walkthrough: your first form, step by step
- Field types: what they do, what they output
- Badges: when forms must trigger on a job
- Auto-generated templates: the bridge from UI to Word
- Merge fields: the mail-merge analogy that makes it click
- Dynamic fields: the free data ServiceM8 fills in for you
- Advanced: checkboxes, skip-if logic, calc fields
- A real form: the Landscaping Quote, end to end
- Automating with AI: a custom MCP server in n8n
- Live demo: Claude builds a form for you
Chapter 02
Anatomy of a ServiceM8 form
A form looks like one thing in the staff app, but under the hood it's three records that point at each other plus a Word file. Knowing this saves a lot of confusion later when an answer renders blank or a template doesn't link.
flowchart LR
    F["FORM
name + badge"]:::core
    FF["FORM FIELDS
your questions"]:::core
    DT["DOCUMENT TEMPLATE
the Word .docx"]:::accent
    FR["FORM RESPONSE
each submission"]:::core

    F --> FF
    F -.points to.-> DT
    F --> FR
    FR -. renders against .-> DT

    classDef core fill:#FFFFFF,stroke:#2A2D82,stroke-width:1.5px,color:#0E1130
    classDef accent fill:#F7941D,stroke:#E67E0A,stroke-width:1.5px,color:#FFFFFF
The four moving parts
- Form: the wrapper. Has a name, a badge, optional template fields.
- Form Field: one record per question. Has a name, a type, optional choices and conditions.
- Document Template: the Word .docx file with merge fields. Linked to the form by UUID.
- Form Response: every time staff submit the form on a job, you get one of these. ServiceM8 renders the response through the template to produce the final PDF, attached to the job.
The terminology
- Merge field / Template Field Code: same thing. The
«form_xxx»placeholder in the Word doc. - Dynamic field: a built-in placeholder ServiceM8 fills automatically (e.g.
«job.contact_first»). - Badge: the tag on a job that says "this form must be completed".
- Slug: the lowercase-with-underscores version of a question name, used inside the merge field code.
Chapter 03
Create your first form: the UI walkthrough
Open ServiceM8, go to Settings → Forms → Add Form, and you'll land on the Modify Form dialog. Five fields, three of which actually matter for getting started. (ServiceM8's own walkthrough is here: how to create form questions.)
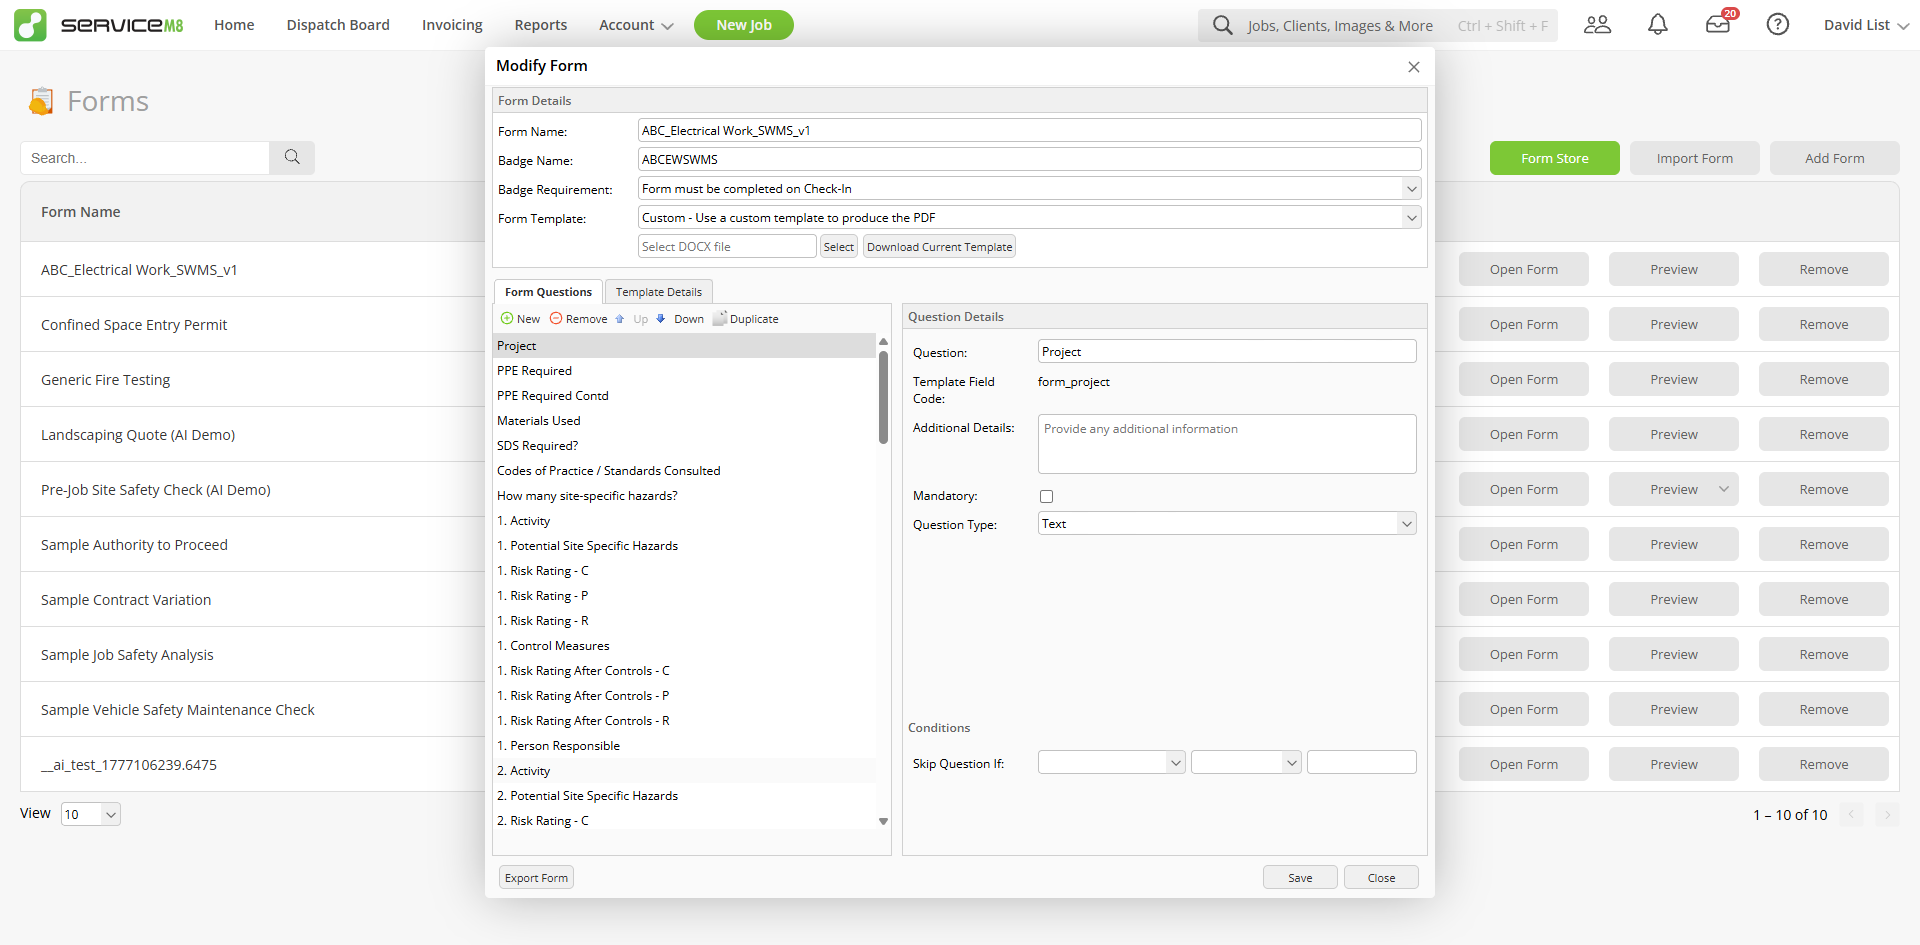
Step by step
form_site_contact. This is the placeholder you'll drop into the Word template. Bookmark these, you'll be using them in Chapter 7.: / & ( ) # can cause problems. Real-world templates do encode them (: becomes __) but the safe default is plain alphanumerics with spaces.
More on ServiceM8: editing forms · pausing & resuming forms
Chapter 04
Field types: what each one is for
Eight question types cover almost every form in the wild. The dropdown shows them in plain English; the Word output is what you embed in the .docx.
form_. Anything that's an image, signatures and photos, uses image_form_. Get the prefix wrong and the field renders blank.
Photo & Signature: pick the right size variant
Every Photo (and Signature) question gives you three merge-field codes, not one. When you set a question's type to Photo, ServiceM8 generates all three variants and you choose which to drop into the template based on how prominent you want the image:
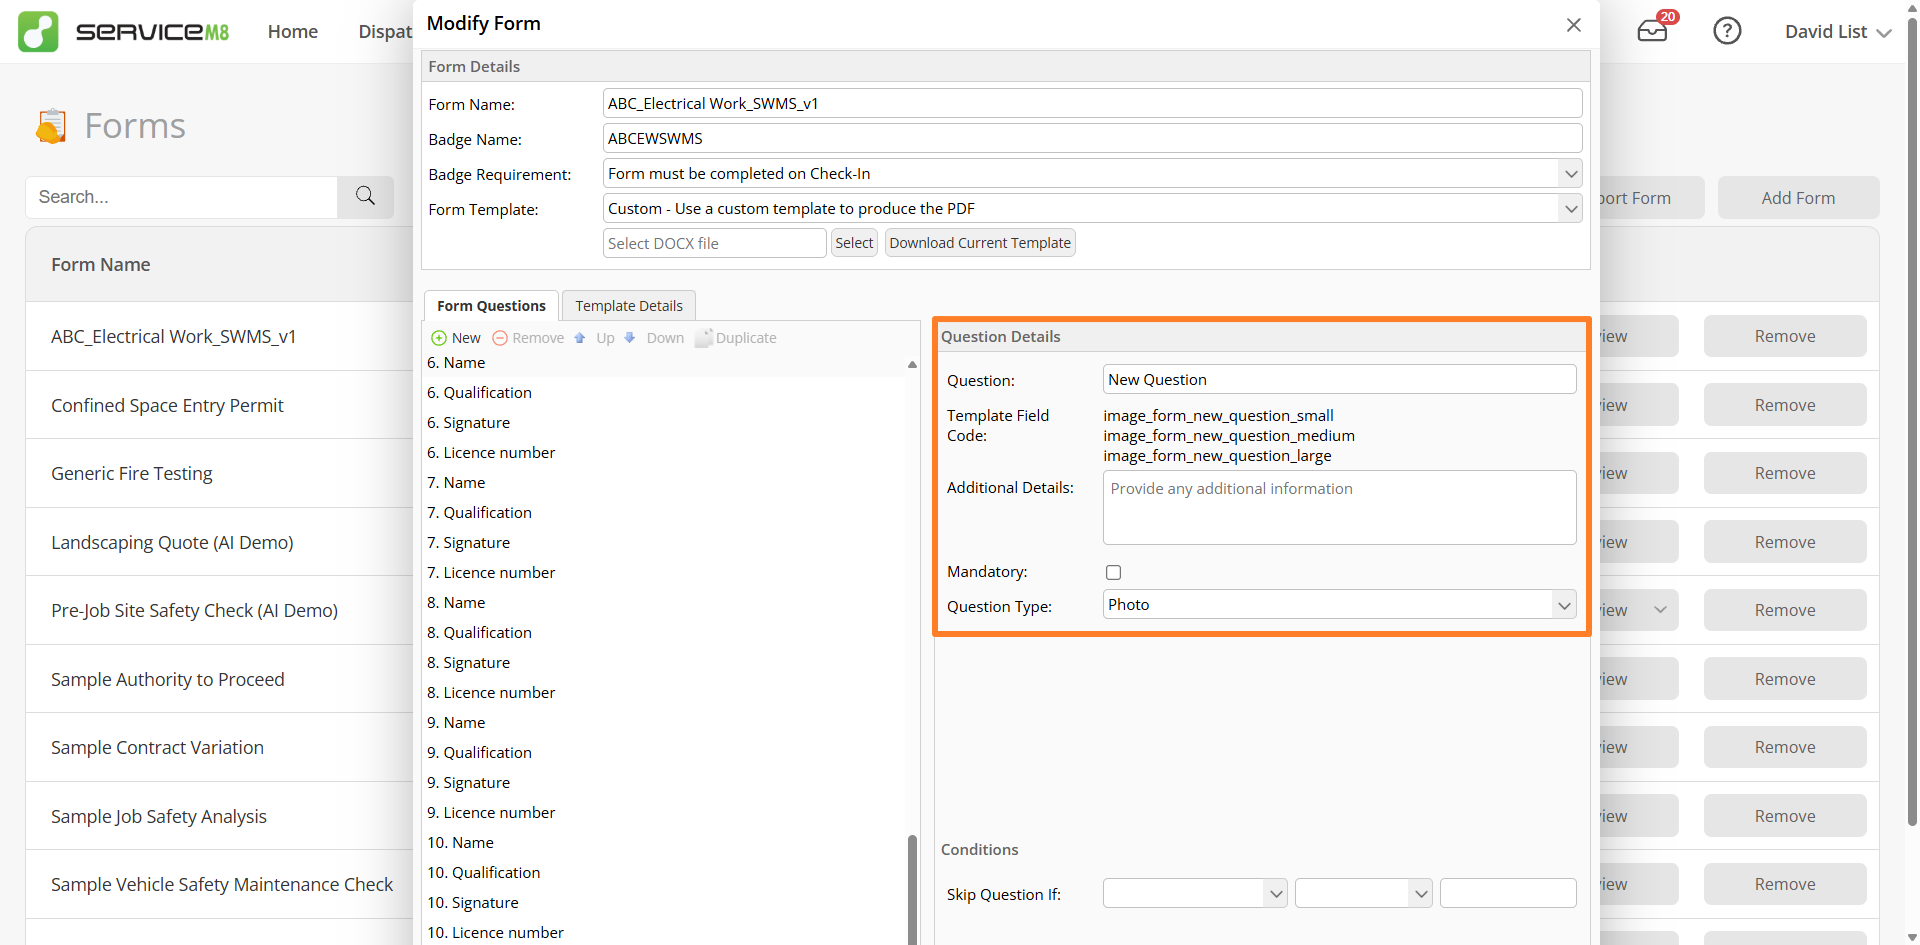
image_form_xxx_small, _medium, _large. Pick the one that fits your layout.| Variant | Use it for | Approx. rendered size |
|---|---|---|
image_form_xxx_small | Inline thumbnails, compact gallery rows, multiple photos side-by-side | Thumbnail (a few centimetres wide) |
image_form_xxx_medium | Mid-page reference shots, two-up before/after layouts | Mid-column (around half the page width) |
image_form_xxx_large | Hero photos, full-width site overviews, sign-off images | Full content width of the page |
ServiceM8 doesn't publish exact pixel dimensions for the three variants, the sizes are designed to fit common DOCX layouts. If your output looks too cramped or too sprawling, swap the suffix and re-render. Reference: how to add a photo into a form.
Template fields: the form-level extras
One more thing the form record can hold: Template Fields. Open your form in ServiceM8 and switch to the Template Details tab. You can add up to ten labelled text fields (Field 1, Field 2, …) with optional default values. Each one becomes a merge field code, for example, a Template Field labelled "Job Review" emits form_job_review.
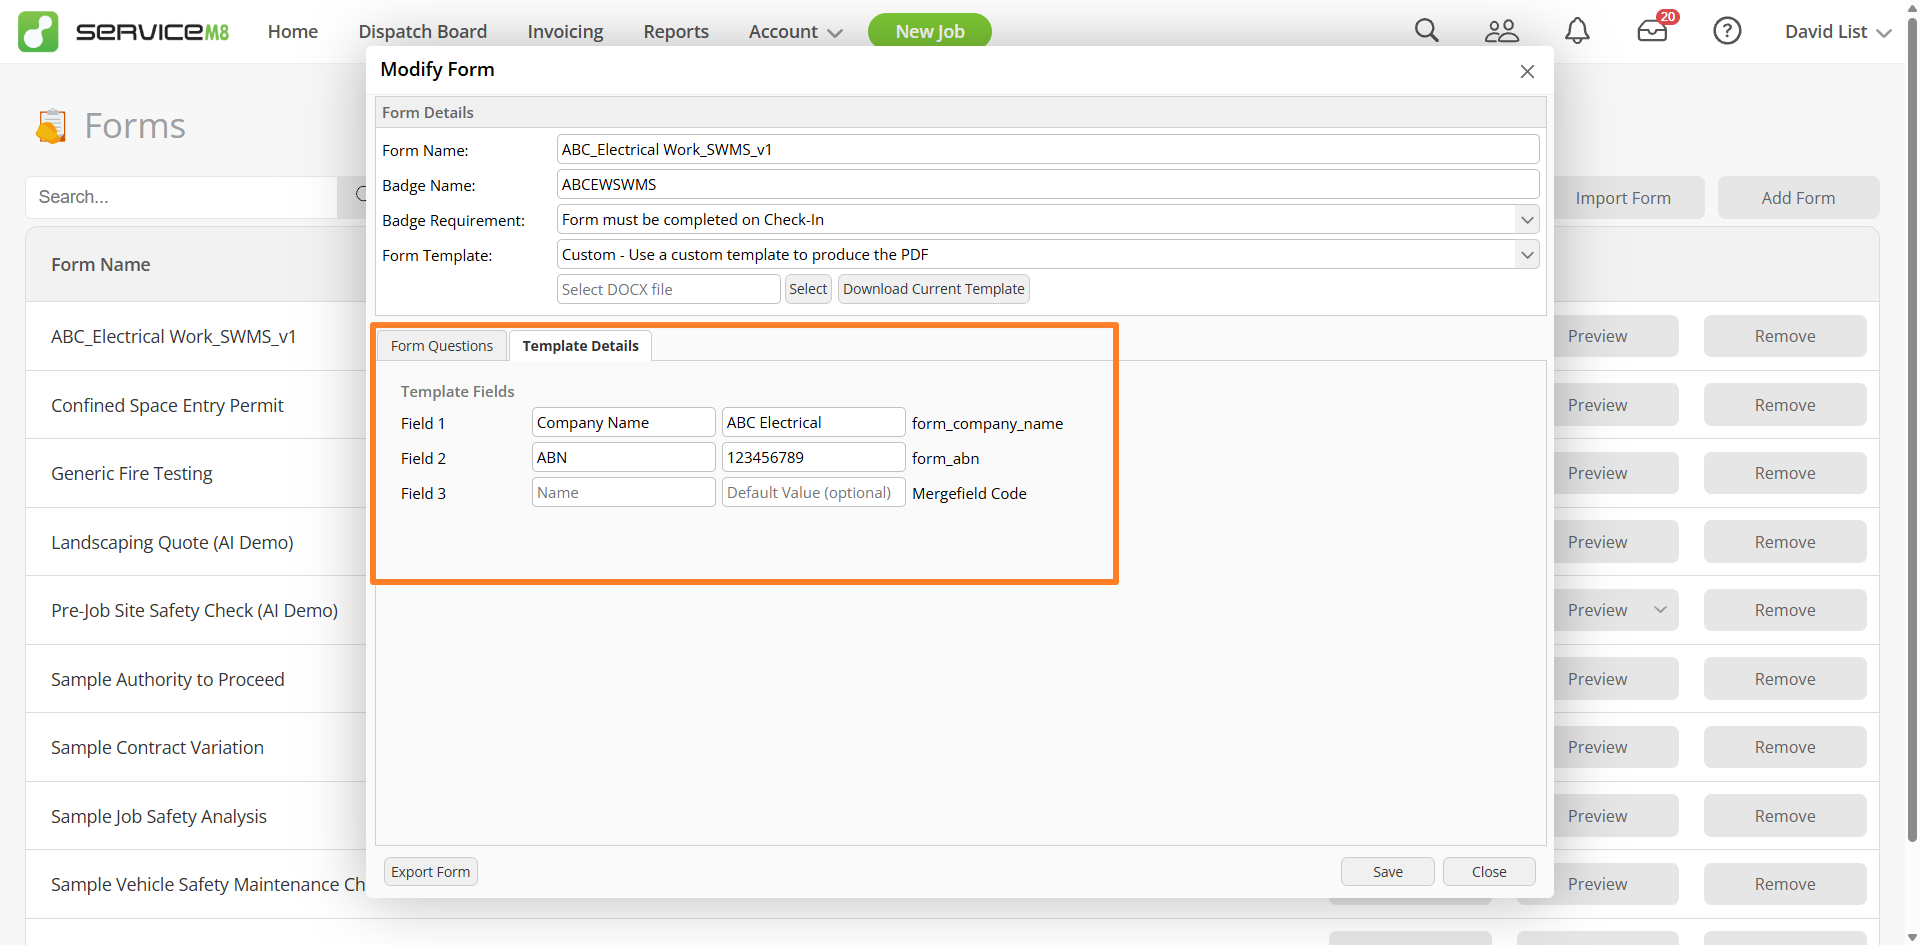
form_job_review. Each Template Field becomes its own merge field code.These are form-level fixed values, not per-response answers. Use them for things that shouldn't change every time a form is filled out, the standard approval block, a default disclaimer, a fixed certifying authority. Set the value once on the form record (or leave the default) and every rendered DOCX gets it.
job.* / vendor.* etc, covered in Chapter 8). All three render the same way in the .docx.
Chapter 05
Badges: applying a form to a job
Badge Requirement, the optional / Check-In / Check-Out trigger, was set when you built the form back in Chapter 3. This chapter is about the other half: how a badge actually lands on a job, where it shows up, and what staff see in the field. (ServiceM8 docs: how to enable a form badge on a job.)
How it gets onto a job
A form is "linked" to a job by adding its badge to the Forms panel on the job card. Open the job, find the Forms panel, hit the add button, pick the form from your library, the badge appears on the job. Done.
Once it's there, two things change:
- The form becomes available to staff in the app: the badge surfaces on the job tile with the form's icon as a coloured background and the badge name overlaid in a small chip.
- The Badge Requirement starts enforcing: if the form is set to "Form must be completed on Check-In" or "on Check-Out", the staff member can't move past that lifecycle step until the form is filled in.
Stacking badges on one job
A job can carry as many badges as you need. Pre-start safety check (Check-In trigger) and sign-off sheet (Check-Out trigger) on the same job? Add both badges. ServiceM8 will enforce each one at its own lifecycle point, the JSA blocks check-in, the sign-off blocks check-out. Staff get a clear "do this next" path through the day without you wiring up any custom logic.
Chapter 06
The auto-generated template: your bridge to Word
You don't have to start the .docx from scratch. ServiceM8 can auto-generate a starter template that already has every Template Field Code wired up to a placeholder in the right place. Open it, and you'll see exactly what the merge field syntax looks like in practice. (ServiceM8 docs: how to create forms using an auto-generated template.)
Generate it, download it, look inside
- Open your form: Settings → Forms → [your form]
- Look for the Form Template field, it has an option to auto-generate a starter Word document
- Generate, then download the .docx
- Open it in Microsoft Word
- You'll see each of your questions laid out as a section, with the answer slot already populated by a MERGEFIELD code like
«form_site_contact»or«image_form_acceptance»
This is the missing manual. Every code you see in the auto-generated template is the exact code ServiceM8 expects in your final template. Copy them, restyle them, rearrange them, but never rename them, or the field renders blank at submission time.
The bridge from UI to Word
This step is the conceptual hinge of the whole system. The form questions you typed in the UI in Chapter 3 became merge field codes in this Word document. The same codes will work whether you keep the auto-generated layout or build a polished branded template, because the codes are derived from the question names, not the layout.
Which means the real question is: what are these merge fields, and how do you write them by hand? That's the next chapter.
Chapter 07
Merge fields: it's a Word mail merge.
If you've ever done a Word mail merge, print 200 letters with names from a spreadsheet, you already know how this works. ServiceM8 is doing exactly the same thing. The form is the spreadsheet of answers; the merge fields in the Word doc are the placeholders. Submit the form, ServiceM8 fills the placeholders, out comes the PDF.
What it looks like in Word
A merge field in Word renders as text wrapped in chevrons:
«form_site_contact»
«form_site_contact_phone»
«image_form_acceptance»
That's the placeholder. When ServiceM8 renders the form response, it swaps each chevron-wrapped code for the actual answer (or image, for signatures and photos).
How to insert one by hand
- Position the cursor where the answer should appear
- Insert → Quick Parts → Field
- Choose MergeField from the list
- In the Field Name box, type the Template Field Code from your form (e.g.
form_site_contact) - Click OK
That's the entire mechanic. Nothing else to install. Nothing magical. Real Word merge fields, all the way down.
On Mac? Word's path differs slightly, ServiceM8 has it covered: how to create a merge field on Mac.
Merge-field keyboard shortcuts
The «form_site_contact» you see in Word is just the display text. The real instruction underneath looks like { MERGEFIELD form_site_contact \* MERGEFORMAT }. Three Word shortcuts let you see and edit that instruction:
- Alt+F9: toggles every field code in the document on/off. Best for surveying the whole template at once.
- Shift+F9: toggles only the field your cursor is on. Best for editing one field without all the others flipping with it.
- Ctrl+F9: inserts a brand-new pair of empty field-code braces
{ }at the cursor, ready for you to type a new field by hand. Less useful day-to-day (you have to type the whole instruction yourself), but you'll need it in Chapter 9 for IF/Wingdings checkboxes.
Once you've toggled a field on with Alt+F9 or Shift+F9, this is what you're looking at:
MERGEFIELD keyword, and the \* MERGEFORMAT switch are Word syntax, leave them alone. The only part you ever edit is the field-name slug in the highlighted box.
The rename gotcha
Here's the thing that trips everyone up: you can't rename a merge field by editing the visible text. If you select «form_site_contact» and retype it as «form_customer_name», the underlying field instruction is still MERGEFIELD form_site_contact, you've only changed the placeholder display. Render the form and it'll still pull from form_site_contact.
To actually change the field, right-click on the merge field and use the context menu:
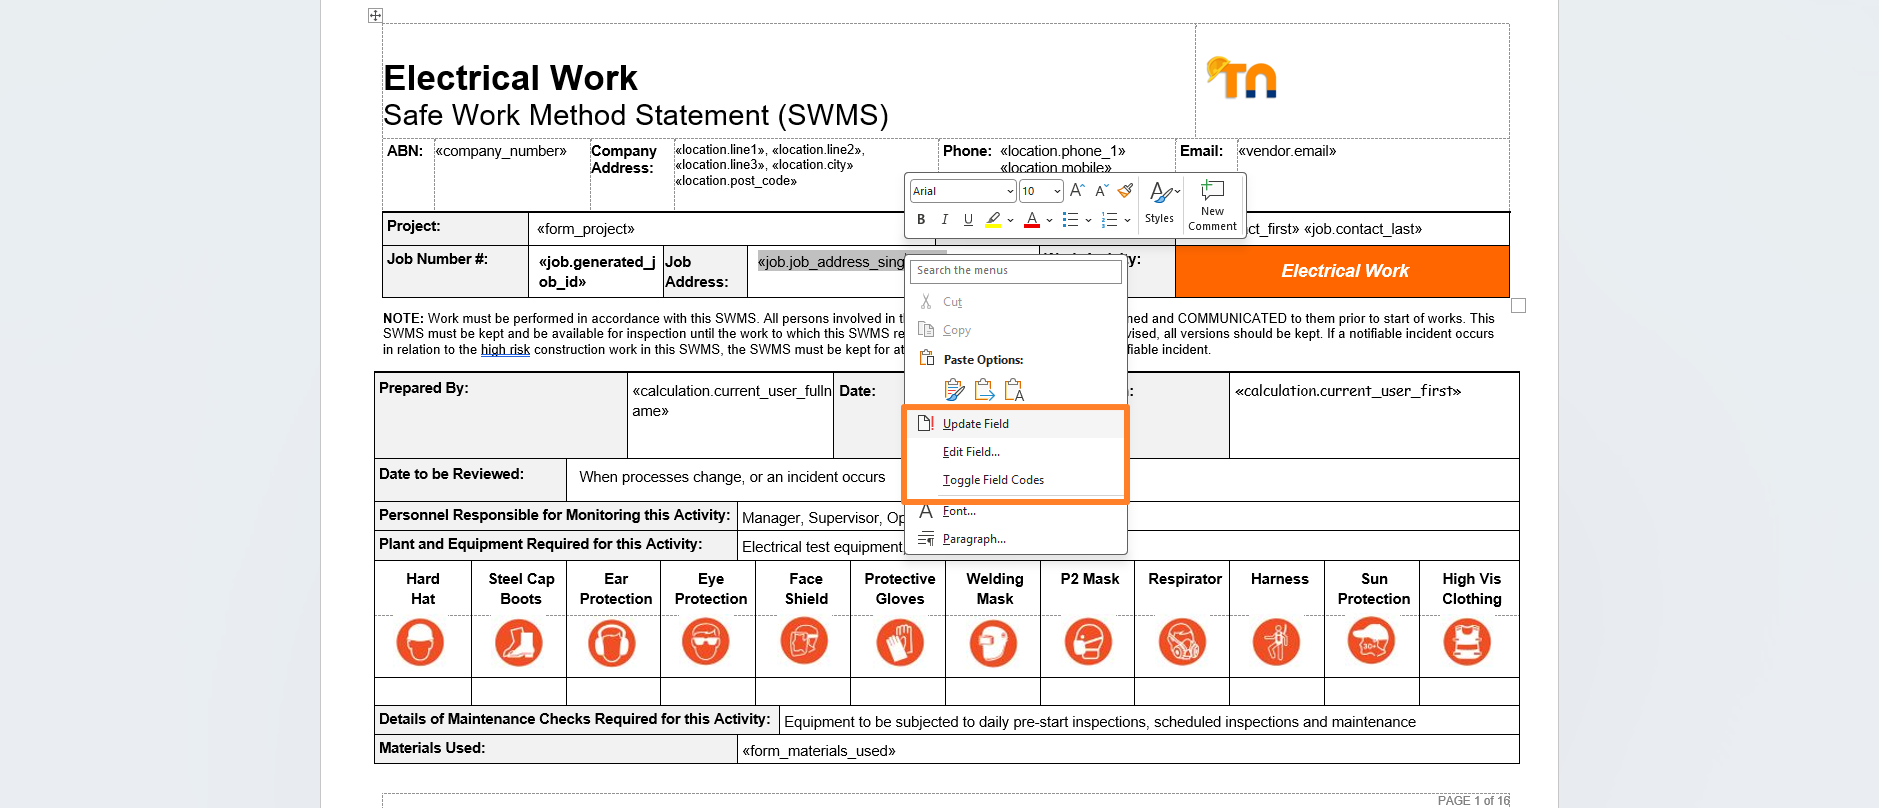
- Edit Field… opens the dialog where you can change the Field Name (the slug). This is the only way to rename safely.
- Toggle Field Codes shows just this field's underlying instruction inline, so you can confirm what slug it's actually pointing at.
- Update Field re-evaluates the field (useful for calc fields and IF fields after you change inputs).
The two prefixes
| Prefix | Used for | Example |
|---|---|---|
| form_ | Text, numbers, dates, single-choice and multi-answer choices | «form_site_contact» |
| image_form_ | Signatures and photos, anything ServiceM8 needs to embed as an image | «image_form_acceptance» |
The slug rule
Question names become merge field codes by a deterministic slug rule. Two versions exist, the official guidance and the practical reality.
Official rule (the safe path)
Use only letters and numbers in question names. Spaces become underscores. ServiceM8 explicitly warns that symbols like : / & ( ) # - "may cause problems."
# Question name → field code
"Site Contact"      → form_site_contact
"Site Contact Mobile" → form_site_contact_mobile
"Signed"            → image_form_signed
Real-world templates (advanced)
Inspecting actual ServiceM8 form templates in the wild shows that special chars are encoded as double-underscores: not blocked, just represented. This is undocumented and fragile; only rely on it if you're scripting templates.
# What the system actually emits
"PPE: Eye Protection"
  → form_ppe__eye_protection

"Codes & Standards"
  → form_codes__standards
Chapter 08
Dynamic fields: the answers you didn't ask for
Not every placeholder in your template needs a form question behind it. ServiceM8 already knows the customer's name, the job address, today's date, your business email, who's logged in. These live in five built-in namespaces, each accessed by a dotted name. Drop them into the .docx and ServiceM8 fills them in at render time, no question, no question name, no slug, just the canonical code.
The five namespaces at a glance
| Namespace | What it covers | Common examples |
|---|---|---|
job.* | The job: contact, address, status, dates, totals, payments, check-ins | job.contact_first, job.job_address, job.generated_job_id |
location.* | Your office: address, phone, GPS coordinates | location.line1, location.city, location.phone_1 |
vendor.* | Your business: name, email, website | vendor.name, vendor.email, vendor.website |
calculation.* | Render-time data: today's date, current user details | calculation.todays_date, calculation.current_user_fullname |
jobMaterial.* | Materials/services on the job: item, qty, cost, price, totals | jobMaterial.name, jobMaterial.quantity, jobMaterial.price |
«job.contact_first» works without you adding a "Contact First Name" question to the form. ServiceM8 substitutes it from the job record at render time. Use these for headers, customer blocks, footers, signature lines, anywhere the data already exists.
The high-value subset for everyday templates
You don't need all 80+ fields. These are the ones that show up in nearly every well-built ServiceM8 template:
| Code | Renders | Use it for |
|---|---|---|
job.generated_job_id | Job number (e.g. s319t) | Header, document title |
job.contact_first + job.contact_last | Customer's full name | Customer block, signature line |
job.job_address | Full job site address | Customer block, header |
job.description | Initial job details | Quote / scope-of-work block |
job.purchase_order_number | PO reference | Header, billing block |
job.total_price | Total invoice value | Pricing footer (after invoicing) |
vendor.name | Your business name | Header, footer, signature |
vendor.email | Your business email | Footer contact line |
location.phone_1 | Your office phone | Footer contact line |
calculation.todays_date | Render date (DD/MM/YYYY) | "Issued on" header |
calculation.current_user_fullname | Staff member who triggered the render | "Prepared by" line, sign-off |
The complete reference for all five namespaces is in Appendix A at the back of this guide.
Chapter 09
Advanced: checkboxes, skip-if, calc fields
The basics get you 80% of the way. The rest of forms, tickbox checkmarks, conditional questions, calculated totals, uses real Word field syntax. None of it is hard once you've seen the pattern; all of it is undocumented enough to be its own forum-question gold mine.
ServiceM8 advanced word formulas walkthrough · remastered on YouTube. Sample document downloadable at the end of this chapter.
Tickbox checkmarks for Multi-Answer questions
When a question is type Multiple Choice (Multi-Answer), each choice gets its own merge field, the slugified choice name appended to the question slug:
# Question: "Materials Required"
# Choices: "Mulch", "Topsoil", "Pavers", "Turf", "Plants"
«form_materials_required_mulch»    # "Yes" if ticked, otherwise blank
«form_materials_required_topsoil»
«form_materials_required_pavers»
«form_materials_required_turf»
«form_materials_required_plants»
That's just text, useful, but you usually want a visible tickbox: ☑ if ticked, ☐ if not. Word can do this with an IF field wrapped around the merge field, swapping Wingdings glyphs:
{ IF "{ MERGEFIELD form_materials_required_mulch }" = "Yes"
       "☑"  (Wingdings F0FE, filled checkbox)
       "☐"  (Wingdings F06F, empty checkbox)
   \* MERGEFORMAT }
To insert this in Word: type the IF field manually with Ctrl+F9 to create field-code braces, embed the MERGEFIELD inside, and switch the two glyphs to the Wingdings font. Once you've built one, copy-paste-tweak for every other choice.
Skip-question-if conditions
Forms get long fast. ServiceM8's Skip Question If hides a question unless an earlier answer matches. In the staff app, the question simply doesn't appear if the condition isn't met, clean, no clutter. (ServiceM8 docs: using the Skip Question If condition.)
Set it up in the question editor: choose the question to test, choose the operator (EQ for equals), pick a value. Multiple conditions can be chained. The Landscaping Quote in the next chapter uses 14 of these to hide material-specific questions unless the relevant material is ticked.
Calc fields: Word does the math
For pricing summaries, hours-times-rate, GST, totals, Word's formula field does arithmetic over your number-type answers, with currency formatting:
{ = { MERGEFIELD form_labour_hours }
    * { MERGEFIELD form_hourly_rate }
    \# "$#,##0.00" }
Combine these with subtotals, GST calcs, and a grand-total line, and your form output prints a fully-itemised quote without a single manual calculation.
Sample formulas: copy & paste
These are the patterns from the webinar's sample document, grouped by what they do. Click any group to expand it. The first one's open. Drop the formula into Word with Ctrl+F9 to create the brace pair, then type the contents (or paste, just remember Word strips merge-field structure when you paste plain text, so the safer move is to open the working .docx below and copy from there).
Math Percentage of job total
Print a percentage of job.total_price, formatted as currency. Useful for deposit amounts, progress payment tranches, partial invoices.
# 90% of the job total
{ =«job.total_price»*0.9 \# "$#,##0.00;($#,##0.00)" }

# 50% (deposit)
{ =«job.total_price»*0.5 \# "$#,##0.00;($#,##0.00)" }

# 30%
{ =«job.total_price»*0.3 \# "$#,##0.00;($#,##0.00)" }

# 10%
{ =«job.total_price»*0.1 \# "$#,##0.00;($#,##0.00)" }
Swap the multiplier for any percentage between 0.01 and 0.99. The \# "$#,##0.00;($#,##0.00)" switch formats the number as currency with negatives in parentheses.
Calculated fields Job & line-item totals
Subtract one merge field from another to derive a calculated value. Two patterns from the webinar:
Total tax of a line item
Inclusive price minus ex-tax price → the tax portion of the line.
{ = { MERGEFIELD jobMaterial.total_price } - { MERGEFIELD jobMaterial.total_price_ex_tax } }
Total profit of a job
Job total revenue minus job total cost → gross profit.
{ = { MERGEFIELD job.total_price } - { MERGEFIELD job.total_cost } }
Wrap either of these in the same \# "$#,##0.00" switch from the percentage pattern to format as currency.
Conditional text Show different value based on a response
Render one string when a form answer matches a target value, another string when it doesn't. The classic Word IF field.
# If form_question = "answer" then "result if true" else "result if false"
{ IF "{ MERGEFIELD form_question }" = "answer" "result if true" "result if false" \* MERGEFORMAT }
Replace form_question with your actual slug, "answer" with the value you're checking against, and the two strings with whatever you want printed. Both strings can be empty ("") if you only want output in one branch.
Tickboxes Check mark for Yes/No or multi-answer questions
Render a Wingdings tick (☑) when the answer is "Yes", a Wingdings empty box (☐) when it isn't. Same pattern works for any single-answer Yes/No question and for any individual choice in a Multi-Answer question.
Single Yes/No tickbox
{ IF "{ MERGEFIELD form_question }" = "Yes"
       "☑"  (Wingdings, F0FE, filled checkbox)
       "☐"  (Wingdings, F06F, empty checkbox)
   \* MERGEFORMAT }
Multi-Answer choice tickbox: worked example
For a Multi-Answer question "Select colours used" with choices Blue / Red / Purple, each choice gets its own merge field with the slug appended:
# Blue
{ IF "{ MERGEFIELD form_select_colours_used_blue }" = "Yes" "☑" "☐" \* MERGEFORMAT }

# Red
{ IF "{ MERGEFIELD form_select_colours_used_red }" = "Yes" "☑" "☐" \* MERGEFORMAT }

# Purple
{ IF "{ MERGEFIELD form_select_colours_used_purple }" = "Yes" "☑" "☐" \* MERGEFORMAT }
In Word, the two checkbox glyphs need their font set to Wingdings for them to render as boxes (otherwise you'll see literal Unicode characters in the document).
The full working .docx with all of these pre-built (plus the field-code structure intact, ready to copy from) is downloadable below:
More on ServiceM8: adding a photo into a form · remote signature · capturing a client's signature after review · form follow-up automation
Chapter 10
A real form, end to end
Everything covered so far comes together in one example: Landscaping Quote (AI Demo). Twenty-six questions, conditional branching across five materials, photos, signatures, calc fields, priority banners. Built once, used per quote.
What's in the form
- Site contact & access: name, phone, gate codes / parking / restrictions
- Materials Required: multi-answer (Mulch / Topsoil / Pavers / Turf / Plants). Drives 14 conditional follow-ups.
- Per-material details: volumes, areas, types, only shown if that material is ticked
- Edging: length and type
- Labour, materials, disposal: feeds the calc fields in the quote PDF
- Special considerations: slope, tree removal, underground services, council permit. Drives the priority banner colours.
- Site photos × 3: overview, existing conditions, access constraints
- Customer acceptance: signature, validates the quote
What the rendered DOCX produces
- Branded header with brand colour, job number, customer name, prepared-by
- Customer block with billing & site details, validity period
- Per-material conditional sections, green "✓ INCLUDED" banner if ticked, grey "(not included)" otherwise
- Site photos table (3 image embeds)
- Special considerations checkboxes + priority banners (red "PRE-START MEETING" if tree removal, amber "PERMIT NEEDED")
- Pricing summary table, materials, labour (hours × rate), disposal, subtotal, GST 10%, TOTAL (bold, large, accent colour)
- Signature acceptance block + footer with
vendor.email
da66fcfc-7e0c-48d7-b6fe-241cf14d136b). A test response with 3 photos was submitted successfully (response UUID ecab2ba7-518c-4f3e-bbe4-241cfe2729fb), proving the photo upload pattern works end to end. Every code shown in this guide is verified against this live form.
Chapter 11
Automating with AI: a custom MCP
The Landscaping Quote took ~30 minutes to build by hand: type 26 questions, set 14 conditions, build the .docx, drop in 50+ merge fields, upload it. Doing this for every form is tedious. So we built an MCP server that lets Claude do it for you.

The architecture
flowchart LR
    USER["You
(plain English)"]:::user
    CD["Claude Desktop"]:::ai
    MCP["n8n workflow
MCP server"]:::tm
    SM8["ServiceM8 API"]:::sm8

    USER --> CD
    CD <-- MCP protocol --> MCP
    MCP <-- HTTPS + API key --> SM8

    classDef user fill:#FFE8CC,stroke:#F7941D,color:#0E1130,stroke-width:1.5px
    classDef ai fill:#E7E8F5,stroke:#2A2D82,color:#0E1130,stroke-width:1.5px
    classDef tm fill:#F7941D,stroke:#E67E0A,color:#FFFFFF,stroke-width:1.5px
    classDef sm8 fill:#FFFFFF,stroke:#2A2D82,color:#0E1130,stroke-width:1.5px
Claude Desktop speaks the Model Context Protocol: an open spec for letting LLMs call external tools. The n8n workflow exposes itself as an MCP server, so Claude can call its tools just like it calls Read/Edit/Bash internally. Each tool wraps one ServiceM8 API endpoint.
The seven tools
| Tool | What it does |
|---|---|
list_forms | Read every form already in your account, see what exists, avoid duplicates, find a UUID. |
list_recent_jobs | Return the 10 most recent jobs, pick a target to test a form against. |
get_form | Read one form's metadata (name, badge, template UUID, template fields). |
list_form_fields | Read every question on a given form, sorted by sort_order. |
create_form | Create a new form record. Returns the new form UUID. |
add_form_field | Add one question to a form. Called once per question. Returns the new field UUID (needed for conditional branching). |
get_docx_build_recipe | Generate a markdown recipe, every merge field code, the IF/Wingdings pattern, the slug rules, that Claude uses to build the matching .docx in its own code-execution environment. |
The "spec-first" prompt pattern
The workflow is designed for one prompt shape: describe the form in plain English, Claude turns it into a structured spec, calls the tools in order. No code from you, no clicking through the SM8 UI for an hour.
- "List the forms in my ServiceM8 account" →
list_formsruns, you see what exists - "Build a [JSA / SWMS / sign-off / quote] form for [scenario]" → Claude proposes a question list
- You confirm or edit →
create_form+add_form_field× N - "Build the matching template" →
get_docx_build_recipe+ Claude builds the .docx locally - You drag-and-drop the .docx into Settings → Document Templates (the one manual step)
Download the workflow
The full n8n workflow JSON, all seven tools, the MCP trigger, the credential references, the embedded recipe generator, is yours. Import it into your own n8n instance and you have a working ServiceM8 Forms MCP server in about three minutes.
What you'll need to wire it up
- An n8n instance (self-hosted or n8n Cloud) with the LangChain / MCP nodes available.
- A ServiceM8 API key: create one in ServiceM8 Settings → Account → API Keys. Add it to n8n as a Header Auth credential named
ServiceM8 API Key(matches the workflow's references): headerX-API-Key, value yoursmk-...key. - A Claude Desktop install (or any MCP-capable client) to connect.
Three-minute install
- In n8n, open Workflows → Import from File, pick the JSON above.
- Open the credential picker on each HTTP Request node and select your
ServiceM8 API Keycredential (or whatever name you chose, n8n will flag any node still missing one). - Activate the workflow. The MCP Server Trigger gives you an HTTP endpoint like
https://your-n8n/mcp/servicem8-forms. - In Claude Desktop's
claude_desktop_config.json, add:"servicem8-forms": { "transport": { "type": "http", "url": "https://your-n8n/mcp/servicem8-forms" } }
- Restart Claude Desktop. Type "List my ServiceM8 forms". The seven tools light up.
Chapter 12
The live demo: Claude builds a form
Three minutes of setup, one prompt, a fully-built form in your ServiceM8 account.
What you'll see on screen
list_forms. The current form library appears. We'll create a new form, no name collision.create_form first to get the form UUID, then loops add_form_field for each question. Each call returns a new field UUID.python-docx. The file appears.What next
Want a custom form built:
or this MCP for your business?
Trade Magnet builds bespoke ServiceM8 forms, document templates, and AI-powered automations. If you've watched the video and want the same setup wired up for your account, get in touch.
trademagnet.com.au →Prefer a pre-built form? Buy one from the ServiceM8 Form Store, or pay ServiceM8 to build a custom form. Trade Magnet is one option among several, pick the one that fits.
Appendix A
Full dynamic-fields reference
Every built-in code ServiceM8 exposes for templates, grouped by namespace. Drop any of these straight into your .docx, no form question required.
job.*: the current job
| Code | Returns |
|---|---|
job.date | Job creation date |
job.generated_job_id | Job number (unique identifier) |
job.status | Quote / Work Order / Completed / Unsuccessful |
job.description | Initial job description |
job.work_done_description | Summary of completed work |
job.category | Job category |
job.purchase_order_number | PO reference |
job.contact_first / job.contact_last | Job contact name |
job.phone_1 / job.mobile / job.email | Job contact phone, mobile, email |
job.job_address | Job site address |
job.job_address_singleline | Job address on one line |
job.billing_address | Billing address |
job.instantpost_billing_address | Billing address in postal format |
job.billing_contact_first / job.billing_contact_last | Billing contact name |
job.phone_2 / job.billing_mobile / job.billing_email | Billing contact phone / mobile / email |
job.property_manager_first / job.property_manager_last | Property manager name |
job.property_manager_phone / job.property_manager_mobile / job.property_manager_email | Property manager contact |
job.site_name | Site name (or customer name if not a job site) |
job.company_name | Customer's company name |
job.booked_by_name | Staff member who booked the job |
job.quote_date | Date marked as Quote |
job.work_order_date | Date marked as Work Order |
job.completion_date | Date marked completed |
job.completion_actioned_by | Staff who marked job completed |
job.unsuccessful_date | Date marked unsuccessful |
job.invoice_date / job.invoice_date_extended | Invoice date (short / long format) |
job.invoice_due_date / job.invoice_due_date_from_today | Invoice due date variants |
job.payment_date | Date payment was processed |
job.payment_actioned_by | Staff who processed payment |
job.payment_method | How payment was made |
job.total_price | Total invoice value (incl. tax) |
job.subtotal_price | Subtotal (excl. tax) |
job.materials_subtotal_price | Total materials cost |
job.labour_subtotal_price | Total labour cost |
job.total_tax_price | Tax total (GST / VAT) |
job.amount_paid | Amount paid by customer |
job.balance_due | Outstanding amount |
job.deposit_amount / job.deposit_description | Deposit due / terms |
job.last_checkin_staff_name | Last check-in staff member |
job.last_checkin_start_date / job.last_checkin_end_date | Last check-in start / end |
job.last_checkin_duration | Last check-in duration |
job.total_checkin_duration | Total check-in time on the job |
location.*: your office
| Code | Returns |
|---|---|
location.name | Location name (e.g. Head Office) |
location.line1 / location.line2 / location.line3 | Office address lines |
location.city | Office city |
location.state | Office state / province |
location.post_code | Office postal / ZIP code |
location.country | Office country |
location.phone_1 | Office phone |
location.mobile | Office mobile |
location.lat / location.lng | Office GPS coordinates |
vendor.*: your business identity
| Code | Returns |
|---|---|
vendor.name | Your company name |
vendor.email | Your company email |
vendor.website | Your company website |
calculation.*: render-time data
| Code | Returns |
|---|---|
calculation.todays_date | Render date (DD/MM/YYYY) |
calculation.todays_date_extended | Render date (long format, e.g. 1 January 2026) |
calculation.current_user_fullname | Current user's full name |
calculation.current_user_first / calculation.current_user_last | Current user's first / last name |
calculation.current_user_email | Current user's email |
calculation.current_user_mobile | Current user's mobile |
calculation.current_user_customfield_licence_number | Current user's licence number |
jobMaterial.*: line items on the job
| Code | Returns |
|---|---|
jobMaterial.item_number | Material / service code |
jobMaterial.name | Material / service name |
jobMaterial.description | Material / service description |
jobMaterial.quantity | Quantity |
jobMaterial.tax_rate | Item tax type |
jobMaterial.cost | Per-item cost |
jobMaterial.price | Per-item price (incl. tax) |
jobMaterial.price_ex_tax | Per-item price (excl. tax) |
jobMaterial.total_price | Line total (incl. tax) |
jobMaterial.total_price_ex_tax | Line total (excl. tax) |
Appendix B
Slug rules & the Wingdings checkbox
Slug encoding cheat sheet
Question name → MERGEFIELD code transform, deduced from real ServiceM8 form templates:
# Per character:
lowercase, then:
  alphanumeric  → keep
  space         → "_"
  any other     → "__"
collapse runs of 3+ underscores → "__"
trim leading / trailing underscores

# Examples observed:
"Hot"                              → form_hot
"Site Contact"                     → form_site_contact
"Materials Required"               → form_materials_required
"PPE Required: Eye Protection"     → form_ppe_required__eye_protection
"Codes of Practice & Standards"     → form_codes_of_practice__standards
"Customer Acceptance" (Signature)   → image_form_customer_acceptance
Multi-Answer choice fields
For a Multi-Answer question, each choice gets its own merge field, the choice slug appended to the question slug:
# Question: "Disposal Required" with choices:
#   Green Waste, Soil and Excavation, Concrete and Hard Fill, None

form_disposal_required_green_waste
form_disposal_required_soil_and_excavation
form_disposal_required_concrete_and_hard_fill
form_disposal_required_none

# Each substitutes "Yes" if ticked, blank otherwise.
The IF/Wingdings pattern (raw OOXML)
For anyone scripting templates, here's the actual 11-run XML sequence ServiceM8 expects per multi-answer choice cell. Field codes nest properly, note the begin/end field-char pairs match like brackets.
<w:r><w:fldChar w:fldCharType="begin"/></w:r>
<w:r><w:instrText xml:space="preserve"> IF " </w:instrText></w:r>
  <w:r><w:fldChar w:fldCharType="begin"/></w:r>
  <w:r><w:instrText xml:space="preserve"> MERGEFIELD form_xxx_choice </w:instrText></w:r>
  <w:r><w:fldChar w:fldCharType="separate"/></w:r>
  <w:r><w:t>«form_xxx_choice»</w:t></w:r>
  <w:r><w:fldChar w:fldCharType="end"/></w:r>
<w:r><w:instrText xml:space="preserve">" = "Yes" "</w:instrText></w:r>
<w:r><w:rPr><w:rFonts w:ascii="Wingdings" w:hAnsi="Wingdings"/></w:rPr>
       <w:sym w:font="Wingdings" w:char="F0FE"/></w:r>     # ☑
<w:r><w:instrText xml:space="preserve">" "</w:instrText></w:r>
<w:r><w:rPr><w:rFonts w:ascii="Wingdings" w:hAnsi="Wingdings"/></w:rPr>
       <w:sym w:font="Wingdings" w:char="F06F"/></w:r>     # ☐
<w:r><w:instrText xml:space="preserve">" \\* MERGEFORMAT</w:instrText></w:r>
<w:r><w:fldChar w:fldCharType="end"/></w:r>
Common pitfalls
- Field renders blank. Slug doesn't match. Open the auto-generated template (Chapter 6), find the right code, copy it verbatim.
- Image renders blank. Used
form_prefix instead ofimage_form_for a Signature or Photo question. - "Yes" appears instead of a checkmark. The IF/Wingdings wrapper is missing, the raw merge field is showing through.
- Calc field shows zero. The number-type question hasn't been answered, or the calc field references the wrong slug.
- Conditional field never appears. Skip-if condition references a question that comes later in sort order, re-order so the trigger question is before the conditional one.
- Template upload silently does nothing. The .docx is fine; you just need to link it on the form record afterwards (set Form Template in the Modify Form dialog).
word/document.xml for MERGEFIELD. The list you see should match every code from the auto-generated template. If something's missing or misspelt, that's the field that's broken.